Introduction to Mehndi Art
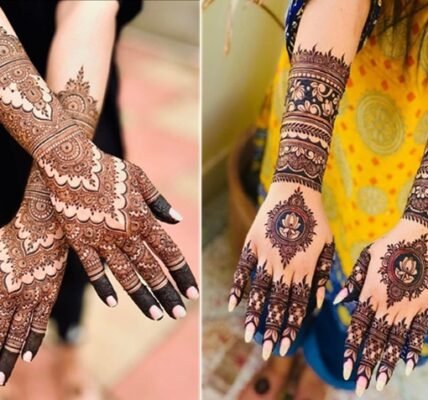
Mehndi Design Easy and Simple Front Hand: Mehndi, also known as henna, is a beautiful form of body art that has been practised for centuries in various cultures, particularly in South Asia, the Middle East, and North Africa. It is traditionally applied during weddings, festivals, and celebrations as a symbol of joy, beauty, and good luck. While intricate and elaborate designs are popular, many people prefer easy and simple mehndi designs for the front hand because they are quick to apply, elegant, and suitable for everyday wear or small gatherings.
In this guide, we will explore some of the best easy and simple mehndi designs for the front hand, along with step-by-step instructions, tips for beginners, and ideas to enhance your henna art. Whether you are a beginner or someone looking for minimalist yet stylish designs, this article will help you create stunning mehndi patterns effortlessly.
Why Choose Simple Mehndi Designs for the Front Hand?
1. Quick and Time-Saving
Elaborate mehndi designs can take hours to complete, but simple front-hand designs are perfect for those who want a beautiful look without spending too much time. These designs usually take 10 to 30 minutes to apply, making them ideal for last-minute events.
2. Beginner-Friendly
If you are new to Mehndi art, starting with easy front-hand designs is the best way to practice. These patterns use basic shapes like dots, lines, and small floral motifs, which are easier to master compared to complex bridal designs.
3. Versatile for Any Occasion
Simple mehndi designs are not just for casual wear—they can also be elegant enough for weddings, parties, and festivals. You can customize them by adding small details or glitter for a more festive look.
4. Less Messy and Easy to Remove
Unlike full-hand designs, simple front-hand mehndi fades evenly and doesn’t leave heavy stains. This makes it a great choice for those who want temporary yet stylish body art.
Top 5 Easy and Simple Mehndi Designs for Front Hand

1. Minimalist Floral Design
This design features small flowers and leaves arranged in a delicate pattern across the fingers and palm.
- How to Apply:
- Start with a thin line from the wrist to the middle finger.
- Add small petals and leaves on either side of the line.
- Finish with tiny dots or swirls for extra detail.
Best for: Casual outings, office wear, or small gatherings.
2. Peacock Feather Motif

A single peacock feather on the back of the hand makes a bold yet simple statement.
- How to Apply:
- Draw a curved stem starting from the wrist.
- Add small feather strokes along the stem.
- Enhance with dots or tiny swirls for a decorative effect.
Best for: Festivals, parties, or cultural events.
3. Arabic-Style Geometric Patterns

Arabic mehndi is known for its flowing lines and bold gaps, making it easy to apply.
- How to Apply:
- Create thick, curved lines from the wrist to the fingertips.
- Fill gaps with small flowers, dots, or loops.
- Keep the design open and airy for a clean look.
Best for: Weddings, Eid celebrations, or evening events.
4. Finger-Tip Mehndi Design

A trendy choice where only the fingertips are decorated with tiny patterns.
- How to Apply:
- Draw small mandalas or half-moons on each fingertip.
- Connect them with thin lines or dots for a cohesive look.
- Add a mini bracelet design near the wrist for balance.
Best for: Modern brides, college students, or casual wear.
5. Sunburst and Moon Design
A sun and crescent moon motif with minimal detailing.
- How to Apply:
- Draw a small sun near the thumb side.
- Add a crescent moon on the opposite side.
- Fill the space with tiny stars or dots.
Best for: Boho-themed parties, music festivals, or spiritual events.
Tips for Applying Mehndi Perfectly

1. Use Fresh Henna Paste
- Always choose natural, fresh henna for a dark and long-lasting stain.
- Avoid chemical-based black henna, as it can cause allergies.
2. Practice on Paper First
- Before applying on your hand, sketch the design on paper to perfect the strokes.
3. Keep the Cone Steady
- Hold the henna cone at a 45-degree angle for smooth application.
- Apply gentle pressure to avoid blobs.
4. Let It Dry Naturally
- After application, keep your hand still for at least 30 minutes.
- Avoid water for 6–8 hours for a deeper stain.
5. Seal with Sugar-Lemon Mix
- A mix of sugar and lemon juice can make the stain darker.
- Apply it before removing the dried henna.
How to Make Your Mehndi Last Longer?
- Avoid water for the first 12 hours.
- Apply coconut oil or mustard oil to keep the skin moisturized.
- Do not scrub the area while washing.
Conclusion
Simple and easy mehndi designs for the front hand are a great way to enjoy henna art without the complexity. Whether you choose minimalist florals, Arabic patterns, or fingertip designs, these styles are quick, elegant, and suitable for all occasions. With a little practice and the right techniques, you can create stunning mehndi art at home.
So, grab a henna cone, follow these tips, and adorn your hands with beautiful, effortless designs!
FAQ (Frequently Asked Questions)
1. Which is the easiest mehndi design for beginners?
A basic floral or dotted pattern is the easiest to start with.
2. How long does simple front-hand mehndi last?
It typically lasts 5-7 days, depending on care.
3. Can I apply Mehndi on both hands?
Yes, but starting with one hand is better for practice.
4. How can I make my mehndi darker?
- Keep the paste on longer (4-6 hours).
- Wrap the hand in plastic wrap to retain heat.
5. What should I avoid after applying mehndi?
- Avoid water, soap, and excessive sweating for at least 8 hours.
Disclaimer
The information provided in this article about mehndi design easy and simple front hand is for informational and educational purposes only. While we strive to ensure accuracy, the effectiveness of mehndi application, color retention, and design preferences may vary based on individual skin types, henna quality, and application techniques.
Read More:-